How to Set Up a VPN A Step-by-Step Guide for All Devices
A comprehensive guide to setting up a VPN on various devices, including Windows, Mac, Android, iOS, and routers, for easy installation.
A comprehensive guide to setting up a VPN on various devices, including Windows, Mac, Android, iOS, and routers, for easy installation.
How to Set Up a VPN A Step-by-Step Guide for All Devices
So, you've decided to boost your online privacy and security with a Virtual Private Network (VPN). That's a smart move! A VPN encrypts your internet traffic and routes it through a server in a location of your choice, making it much harder for anyone to snoop on your activities or track your digital footprint. But once you've picked a VPN service, the next step is setting it up on your devices. Don't worry, it's usually a straightforward process, and I'm here to walk you through it, step by step, for all your gadgets.
Understanding VPN Setup Basics What You Need to Know
Before we dive into the specifics for each device, let's cover some general concepts. Most reputable VPN providers offer dedicated applications for popular operating systems. These apps are designed to make the setup process as simple as possible, often requiring just a few clicks. However, for some devices or advanced configurations, you might need to set up the VPN manually. Regardless of the method, the core idea remains the same: connecting your device to a VPN server.
What you'll typically need:
- A VPN Subscription: This is obvious, but you need an active account with a VPN provider. I'll recommend a few popular ones later.
- Your Login Credentials: Your username and password for the VPN service.
- Internet Connection: You need to be online to download the app and connect to the VPN server.
Setting Up a VPN on Windows Your Desktop Security Guide
Windows is one of the most common platforms for VPN usage. Here's how to get started:
Method 1 Using the VPN Provider's App Recommended for Windows Users
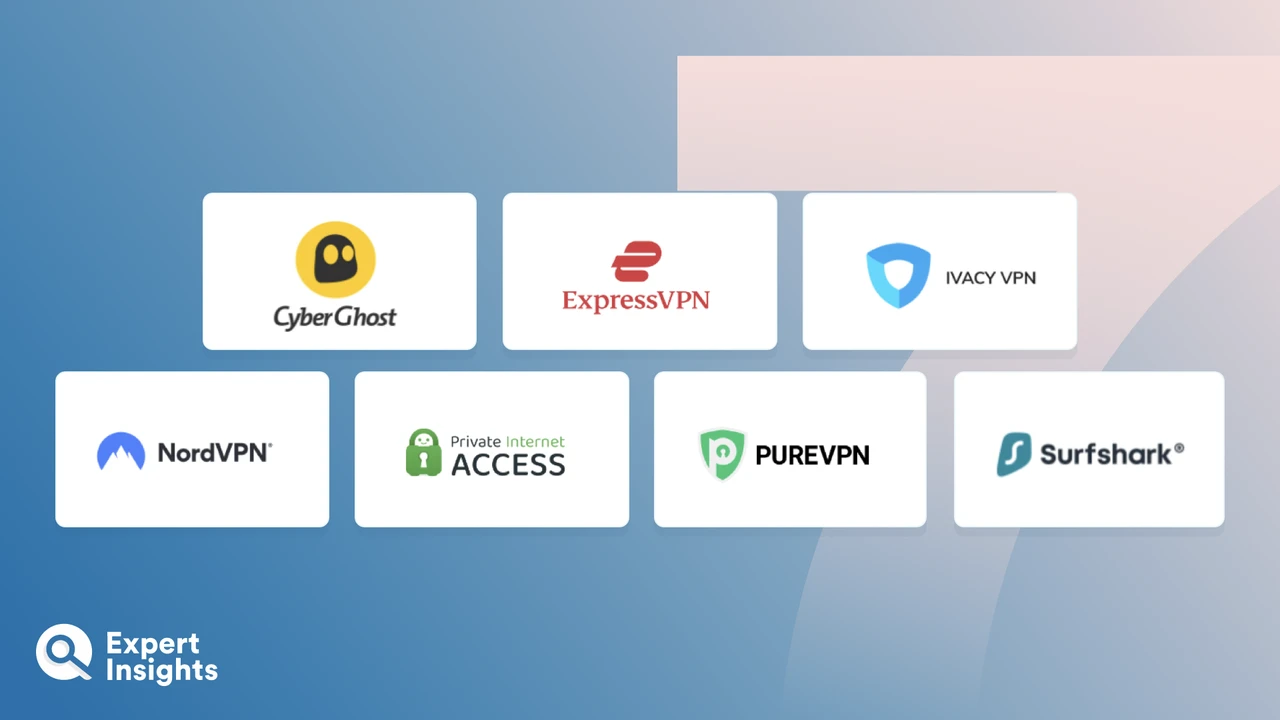
- Choose Your VPN Provider: For Windows, I highly recommend NordVPN, ExpressVPN, or Surfshark. They all have excellent, user-friendly Windows applications.
- Download the App: Go to your chosen VPN provider's official website. Look for a 'Download' or 'Apps' section. Download the Windows client.
- Install the App: Locate the downloaded file (usually in your 'Downloads' folder) and double-click it. Follow the on-screen instructions. This is typically a standard software installation process. You might need to grant administrative permissions.
- Launch and Log In: Once installed, open the VPN application. You'll be prompted to log in with your VPN account credentials.
- Connect to a Server: Most VPN apps have a 'Quick Connect' button that automatically connects you to the fastest available server. Alternatively, you can browse the server list and choose a specific country or city.
- Verify Connection: The app will usually indicate when you're connected. You can also visit a website like 'whatismyip.com' to confirm your IP address has changed to reflect the VPN server's location.
Method 2 Manual VPN Setup on Windows For Advanced Users
This method is less common for everyday use but can be useful for specific scenarios or if you prefer not to use the provider's app. It typically involves using Windows' built-in VPN client.
- Gather VPN Configuration Details: You'll need server addresses, VPN type (e.g., L2TP/IPsec, SSTP, IKEv2), and authentication details from your VPN provider's website or support.
- Open VPN Settings: Go to 'Settings' > 'Network & Internet' > 'VPN'.
- Add a VPN Connection: Click 'Add a VPN connection'.
- Fill in Details:
- VPN provider: Windows (built-in)
- Connection name: Give it a memorable name (e.g., 'My VPN').
- Server name or address: Enter the server address provided by your VPN.
- VPN type: Select the protocol (e.g., L2TP/IPsec with pre-shared key).
- Type of sign-in info: Choose 'Username and password'.
- Username and password: Enter your VPN credentials.
- Save and Connect: Click 'Save'. Then, click on your new VPN connection and select 'Connect'.
Setting Up a VPN on macOS Your Apple Device Security Guide
Mac users also have straightforward options for VPN setup.
Method 1 Using the VPN Provider's App Recommended for macOS Users
- Choose Your VPN Provider: ExpressVPN, NordVPN, and CyberGhost offer excellent macOS applications.
- Download the App: Visit your VPN provider's website and download the macOS client.
- Install the App: Open the downloaded .dmg file and drag the VPN application icon to your 'Applications' folder.
- Launch and Log In: Open the app from your 'Applications' folder or Launchpad. Enter your VPN account details.
- Connect to a Server: Use the 'Quick Connect' feature or manually select a server location.
- Verify Connection: The app will confirm your connection. You can also check your IP address online.
Method 2 Manual VPN Setup on macOS For Specific Needs
Similar to Windows, macOS has a built-in VPN client, though it supports fewer protocols natively.
- Gather VPN Configuration Details: You'll need server addresses, VPN type (e.g., L2TP/IPsec, IKEv2), and authentication details from your VPN provider.
- Open Network Preferences: Go to 'System Settings' (or 'System Preferences' on older macOS versions) > 'Network'.
- Add a VPN Interface: Click the '+' button at the bottom left, select 'VPN' from the 'Interface' dropdown, and choose the 'VPN Type' (e.g., L2TP over IPsec). Give it a name.
- Configure VPN Settings:
- Server Address: Enter the VPN server address.
- Account Name: Your VPN username.
- Authentication Settings: Click this button. Enter your password and the shared secret (if using L2TP/IPsec).
- Apply and Connect: Click 'Apply', then 'Connect'.
Setting Up a VPN on Android Your Mobile Security Companion
Protecting your Android phone or tablet is crucial, especially when using public Wi-Fi.
Method 1 Using the VPN Provider's App Recommended for Android Users
- Choose Your VPN Provider: Surfshark, NordVPN, and ExpressVPN all have excellent Android apps.
- Download the App: Open the Google Play Store on your Android device. Search for your VPN provider's app.
- Install the App: Tap 'Install' and wait for the app to download and install.
- Launch and Log In: Open the app and enter your VPN account credentials.
- Grant Connection Permission: Android will ask for permission to set up a VPN connection. Tap 'OK' or 'Allow'.
- Connect to a Server: Tap the 'Connect' button or choose a server from the list.
- Verify Connection: A key icon usually appears in your notification bar, indicating an active VPN connection.
Method 2 Manual VPN Setup on Android For Specific Configurations
Android also supports manual VPN setup, primarily for L2TP/IPsec and IKEv2.
- Gather VPN Configuration Details: Obtain server addresses, VPN type, and authentication details from your VPN provider.
- Open VPN Settings: Go to 'Settings' > 'Network & internet' > 'VPN'. (The exact path might vary slightly depending on your Android version and device manufacturer).
- Add a VPN Profile: Tap the '+' icon (or 'Add VPN profile').
- Fill in Details:
- Name: Give it a name.
- Type: Select the VPN protocol (e.g., L2TP/IPSec PSK).
- Server address: Enter the server address.
- L2TP secret / IPSec pre-shared key: Enter if required.
- Username and password: Enter your VPN credentials.
- Save and Connect: Tap 'Save'. Then, tap on the newly created VPN profile and tap 'Connect'.
Setting Up a VPN on iOS Your iPhone and iPad Security Guide
iPhones and iPads are just as vulnerable to online threats, making a VPN essential.
Method 1 Using the VPN Provider's App Recommended for iOS Users
- Choose Your VPN Provider: ExpressVPN, NordVPN, and Private Internet Access (PIA) have highly-rated iOS apps.
- Download the App: Open the App Store on your iOS device. Search for your VPN provider's app.
- Install the App: Tap 'Get' and then 'Install'. You might need to authenticate with Face ID, Touch ID, or your Apple ID password.
- Launch and Log In: Open the app and enter your VPN account credentials.
- Allow VPN Configuration: iOS will ask for permission to add VPN configurations. Tap 'Allow' and authenticate with your passcode, Face ID, or Touch ID.
- Connect to a Server: Tap the 'Connect' button or choose a server location.
- Verify Connection: A 'VPN' icon will appear in your status bar at the top of the screen when connected.
Method 2 Manual VPN Setup on iOS For Specific Scenarios
iOS supports manual VPN setup for IKEv2, L2TP/IPsec, and PPTP (though PPTP is outdated and not recommended).
- Gather VPN Configuration Details: Get server addresses, VPN type, and authentication details from your VPN provider.
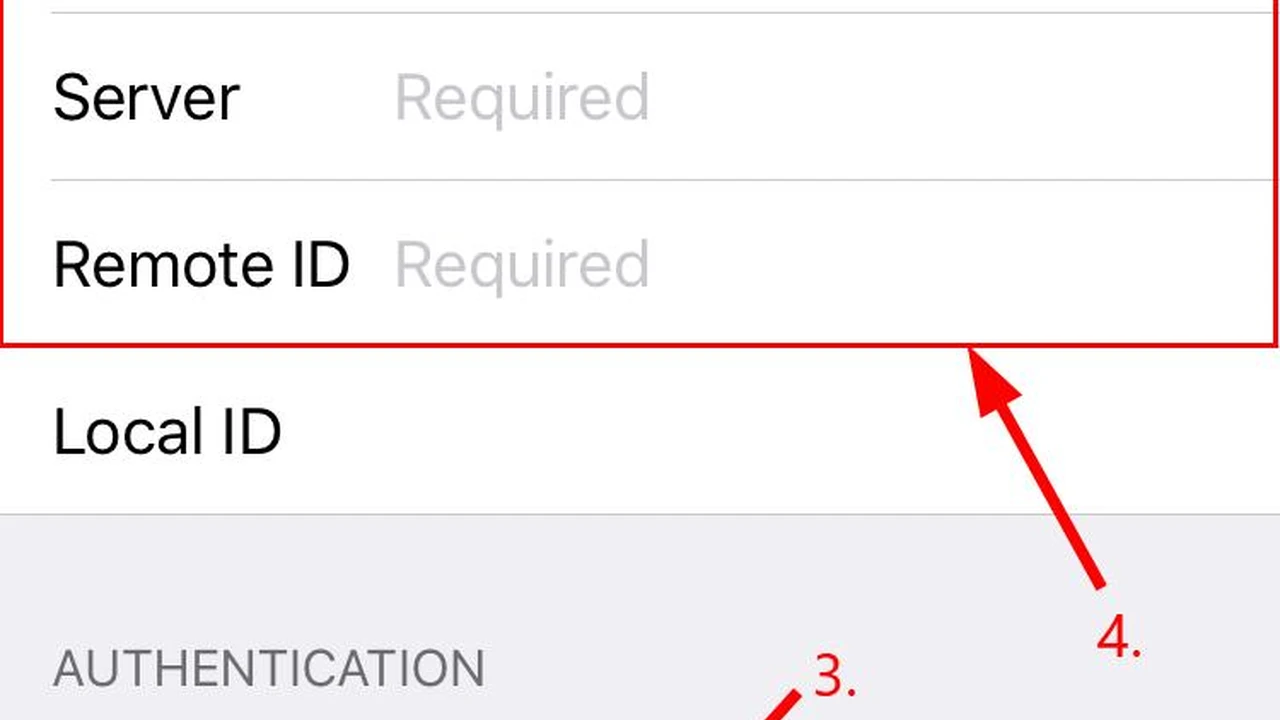
- Open VPN Settings: Go to 'Settings' > 'General' > 'VPN & Device Management' > 'VPN'.
- Add VPN Configuration: Tap 'Add VPN Configuration...'.
- Fill in Details:
- Type: Select the VPN protocol (e.g., IKEv2).
- Description: Give it a name.
- Server: Enter the server address.
- Remote ID: (For IKEv2) Enter the remote ID provided by your VPN.
- Local ID: (Optional)
- User Authentication: Choose 'Username' or 'Certificate'.
- Username and Password: Enter your VPN credentials.
- Secret: (For L2TP/IPsec) Enter the shared secret.
- Save and Connect: Tap 'Done'. Then, toggle the VPN switch to 'On' for your new configuration.
Setting Up a VPN on Your Router Network-Wide Protection
Setting up a VPN on your router is a game-changer. It protects every device connected to your home network, including smart TVs, gaming consoles, and IoT devices that can't run VPN apps directly. This means one setup, whole-home protection!
Router VPN Setup Considerations What You Need to Know
- Compatible Router: Not all routers support VPN client functionality. You'll typically need a router that can be flashed with custom firmware like DD-WRT or Tomato, or a router that natively supports VPN clients (e.g., some Asus, Netgear, or Linksys models). Check your router's specifications.
- VPN Provider Support: Ensure your VPN provider offers router setup guides and configuration files (like .ovpn files for OpenVPN). ExpressVPN is particularly good here, offering custom firmware for some routers, making setup much easier. NordVPN and Surfshark also provide excellent router support.
- Technical Skill: This method is generally more complex than app-based setups and might require some technical know-how.
General Steps for Router VPN Setup A Universal Approach
- Check Router Compatibility: First, confirm your router supports VPN client mode. Look for 'VPN Client' in its settings or check online.
- Download Configuration Files: Log in to your VPN provider's website. Navigate to their router setup section. You'll usually find .ovpn configuration files for OpenVPN or other protocol-specific files. Download the ones for your desired server locations.
- Access Router Admin Panel: Open a web browser and type your router's IP address (e.g., 192.168.1.1 or 192.168.0.1) into the address bar. Log in with your router's admin username and password.
- Locate VPN Client Settings: The exact location varies by router. Look for sections like 'VPN', 'VPN Client', 'OpenVPN Client', or 'Advanced Settings'.
- Import or Manually Configure:
- Import .ovpn file: Many routers allow you to simply upload the .ovpn file you downloaded. This is the easiest method.
- Manual Configuration: If importing isn't an option, you'll need to manually enter details like server address, port, protocol, encryption type, and your VPN username/password. This information is usually found within the .ovpn file (you can open it with a text editor) or on your VPN provider's website.
- Apply Settings and Connect: Save your settings and enable the VPN client. Your router should then connect to the VPN server.
- Verify Connection: Connect a device to your router's Wi-Fi and check its IP address using 'whatismyip.com'. It should show the VPN server's IP.
Recommended VPNs for Router Setup and Their Pricing
ExpressVPN The Router Champion
- Why it's great for routers: ExpressVPN offers custom firmware for a wide range of popular routers (Asus, Linksys, Netgear, etc.), making the setup process incredibly user-friendly. Their firmware provides a dedicated interface to manage VPN connections directly from your router, including easy server switching and split tunneling.
- Pricing: Typically starts around $6.67/month for a 12-month plan, often with 3 extra months free. They offer a 30-day money-back guarantee.
- Use Case: Ideal for users who want to protect all devices on their network, including smart home devices, gaming consoles, and streaming boxes, with minimal hassle.
NordVPN Robust and Versatile
- Why it's great for routers: NordVPN provides detailed manual setup guides for various router firmware (DD-WRT, Tomato, OpenWRT) and supports OpenVPN configuration files. While it doesn't offer custom firmware like ExpressVPN, its extensive documentation makes it a solid choice for those comfortable with manual setup.
- Pricing: Often around $3.29/month for a 2-year plan. Also includes a 30-day money-back guarantee.
- Use Case: Excellent for users who want strong security features like Double VPN and CyberSec on their entire network, and are comfortable with a slightly more involved setup process.
Surfshark Budget-Friendly Network Protection
- Why it's great for routers: Surfshark supports OpenVPN and IKEv2 protocols for router setup and provides clear guides for DD-WRT, Tomato, and other compatible routers. It's a great option for protecting unlimited devices on a budget.
- Pricing: Can be as low as $2.29/month for a 2-year plan. Comes with a 30-day money-back guarantee.
- Use Case: Perfect for large households or users with many devices who want comprehensive network-wide protection without a hefty price tag.
Setting Up a VPN on Linux Your Open Source Security
Linux users often prefer command-line interfaces or Network Manager for VPN setup.
Method 1 Using the VPN Provider's App For Simplicity on Linux
Some VPN providers, like NordVPN and ExpressVPN, offer dedicated command-line or GUI applications for Linux distributions (Ubuntu, Debian, Fedora, etc.).
- Download the App: Go to your VPN provider's website and download the Linux client package (e.g., .deb for Debian/Ubuntu, .rpm for Fedora).
- Install the App: Open your terminal and use your package manager to install it (e.g.,
sudo dpkg -i nordvpn-release_1.0.0_all.debfor NordVPN on Ubuntu, thensudo apt update && sudo apt install nordvpn). - Log In and Connect: Follow the provider's instructions, usually involving
nordvpn loginand thennordvpn connect.
Method 2 Manual VPN Setup on Linux Using Network Manager
This is a common and flexible way to set up OpenVPN or IKEv2 on most Linux distributions.
- Install OpenVPN (if needed): Open a terminal and install the OpenVPN client and Network Manager plugin:
sudo apt install openvpn network-manager-openvpn network-manager-openvpn-gnome(for Ubuntu/Debian). - Download .ovpn Files: Get the OpenVPN configuration files from your VPN provider's website.
- Open Network Settings: Go to 'Settings' > 'Network' (or 'Network Connections').
- Add a VPN Connection: Click the '+' button to add a new connection. Choose 'VPN'.
- Import .ovpn File: Select 'Import from file...' and choose one of the .ovpn files you downloaded.
- Enter Credentials: Enter your VPN username and password when prompted.
- Save and Connect: Click 'Add' or 'Save'. Then, toggle the VPN connection to 'On' from the Network Manager icon in your system tray.
Troubleshooting Common VPN Setup Issues Quick Fixes
Even with the best guides, sometimes things don't go perfectly. Here are some common issues and how to fix them:
Connection Failed or VPN Not Connecting
- Check Internet Connection: Make sure you're actually connected to the internet before trying to connect to the VPN.
- Restart VPN App/Device: A simple restart of the VPN application or your device can often resolve temporary glitches.
- Try Different Server: The server you're trying to connect to might be overloaded or temporarily down. Try connecting to a different server location.
- Change VPN Protocol: In your VPN app settings, try switching to a different protocol (e.g., from WireGuard to OpenVPN UDP, or vice versa).
- Disable Firewall/Antivirus Temporarily: Your firewall or antivirus software might be blocking the VPN connection. Temporarily disable them to see if that's the issue (remember to re-enable them afterward!).
- Check Credentials: Double-check that you're entering the correct username and password for your VPN service.
Slow Speeds After Connecting to VPN
- Try Closer Server: Connecting to a VPN server geographically closer to you will generally result in faster speeds.
- Change VPN Protocol: Some protocols are faster than others. WireGuard is often the fastest, followed by OpenVPN UDP. Experiment with different protocols in your VPN app settings.
- Restart Router: Sometimes your home router might be the bottleneck. Give it a quick reboot.
- Check Server Load: Some VPN apps show server load. Choose a server with lower load.
- Disable Extra Features: Features like ad blockers or malware protection within the VPN app can sometimes slightly impact speed. Try disabling them to see if it helps.
VPN Disconnects Frequently
- Switch Servers: A particular server might be unstable. Try another one.
- Change Protocol: Some protocols are more stable than others. OpenVPN TCP can be more stable than UDP, though often slower.
- Check Wi-Fi Signal: A weak or unstable Wi-Fi connection can cause VPN disconnections. Try moving closer to your router or using a wired connection.
- Update VPN App: Ensure your VPN application is updated to the latest version.
- Contact Support: If the issue persists, reach out to your VPN provider's customer support. They can often diagnose specific problems.
Maximizing Your VPN Experience Beyond Basic Setup
Once your VPN is up and running, there are a few extra steps you can take to ensure you're getting the most out of it:
Enable Kill Switch For Uninterrupted Protection
A kill switch is a vital VPN feature that automatically disconnects your device from the internet if your VPN connection drops unexpectedly. This prevents your real IP address and unencrypted data from being exposed. Most good VPN apps have this feature, and it's usually enabled by default or easily found in the settings. Always make sure it's on!
Use Split Tunneling For Selective VPN Usage
Split tunneling allows you to choose which applications or websites use the VPN connection and which access the internet directly. For example, you might want your streaming app to bypass the VPN for better speed, while your browser traffic remains encrypted. This feature is available in many VPN apps (like ExpressVPN and NordVPN) and can be configured in their settings.
Regularly Update Your VPN App For Latest Security
VPN providers constantly update their applications to improve performance, add new features, and patch security vulnerabilities. Make sure you keep your VPN app updated to benefit from the latest protections and optimizations.
Choose the Right Protocol For Speed and Security Balance
Most VPN apps allow you to choose between different VPN protocols (e.g., OpenVPN, WireGuard, IKEv2). WireGuard is generally the fastest and most modern, offering a great balance of speed and security. OpenVPN is highly secure and widely supported. Experiment with different protocols to find the best balance for your needs.
Connect to the Closest Server For Optimal Performance
Unless you need to access geo-restricted content from a specific country, connecting to a VPN server that is geographically closer to your physical location will almost always give you the best speeds and lowest latency.
Setting up a VPN might seem daunting at first, but with these step-by-step guides, you should be able to get your devices protected in no time. Whether you're on Windows, Mac, Android, iOS, or even your home router, there's a method that works for you. Enjoy your newfound online privacy and freedom!
:max_bytes(150000):strip_icc()/277019-baked-pork-chops-with-cream-of-mushroom-soup-DDMFS-beauty-4x3-BG-7505-5762b731cf30447d9cbbbbbf387beafa.jpg)